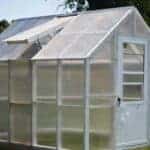
How to Build a Greenhouse
I have desired my own greenhouse to extend our growing season for quite awhile. My husband did a lot of research and came up with a plan on just how to build a greenhouse that would work on our small homestead.This tutorial comes with printable free greenhouse plans!
Cost: 750
Equipment
- A really good drill!
- And misc other tools as needed
Ingredients
- 12 8′ long, 6 mm greenhouse polycarbonate sheets
- 4 16′ 2×4
- 4 16′ 4×4
- 3 ″ deck screws
- 10 ′ rain cap
- APPROXIMATE DIMENSIONS
- THESE WERE THE 4×4 TIMBER:
- 2 base ends dimensions 3 1/2 x 3 1/2 x 96″
- 2 base sides dimensions 3 1/2 x 3 1/2 x 113″
- AND THESE WERE THE 2×4 TIMBER:
- 2 sole plates ends dimensions 1 1/2 x 3 1/2 x 89″
- 2 sole plates sides dimensions 1 1/2 x 3 1/2 x 120″
- 12 wall stud sides dimensions 1 1/2 x 3 1/2 x 57″
- 1 ridge support dimensions 1 1/2 x 3 1/2, 91″
- 2 back studs dimensions 1 1/2 x 3 1/2, 76″
- 2 door frame sides dimensions 1 1/2 x 3 1/2 x 81″
- 1 cripple stud dimensions 1 1/2 x 3 1/2 x 16″
- 1 door header dimensions 1 1/2 x 3 1/2 x 32″
- 2 knee wall caps 1 1/2 x 3 1/2 x 120″
- 1 ridge pole 1 1/2 x 3 1/2 x 120″
- 12 rafters 1 1/2 x 3 1/2 x 60″
Instructions
- Measure and cut your lumber. Approximate dimensions – always take actual length and angle measurements on structure before cutting. There’s a saying and maybe you’ve heard it before. “Measure twice and cut once”.
- The first step was to build the base and then frame for the wall.
- Once the wall frames were built, we attached them to the base using those 3″ deck screws.
- Measure out your door frame. I wanted a screen door on mine, so my husband cut and measured the frame to fit this.
- Next, install your rafters.
- At this point, if you want yours painted, this is a good place to do that.
- Now you can begin to add your plastic sheeting, secured with screws. This sheeting came in 8′ pieces so we cut them to size.
- We also cut scrap lumber to size and added them between the wall frames for additional stability. (see photo above)
- My husband also added scrap pieces of wood on the arches in the rafters.
- For the vent, he just measured the space between the rafters and made two of these pieces to fit.
- Lastly, he added an 10′ rain cap to the top of the roof to keep the rain out.
- You can also use metal stakes to secure it in the ground.
Notes
Again, I want to stress this. These measurements are approximates. We had to cut some pieces to size as we were building it.
“Measure twice and cut once”.